

How To Make A Textured Ceiling
How to Texture a Ceiling and Walls: Apply Knockdown
Updated: January. 07, 2019
Spray ceiling texture to add visual interest and hide imperfections. Go along reading to learn how to texture a ceiling and walls.
Use this simple technique to add graphic symbol to walls and ceilings, and to help blend the old with the new while remodeling. Textures give polish, flat walls and ceilings a new dimension that enhances a room. This is a cracking projection for problem walls as the texture hides minor imperfections.
You might also like: TBD
- Time
- Complexity
- Price
- A full twenty-four hour period
- Beginner
- $51–100
Choosing your materials
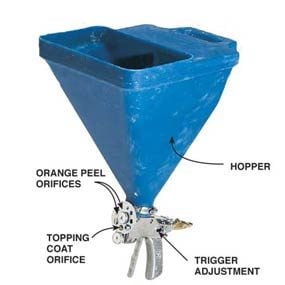
Close-upwardly: sprayer and hopper
The crucial components of a spray gun.
Textures add an entirely new dimension to apartment, smooth walls. Instead of a blank slate, you'll have a surface that will attract attention, add together visual interest and warm the room with an earthy, organic experience. This technique also helps hibernate minor imperfections, making it a great way to meld remodeled walls with existing ones—no small bonus to those of us still perfecting our drywall-taping skills!
Applying a knockdown texture is an easy, depression-cost, low-tech projection that can dramatically alter a room's appearance and simplify wall repairs. The proper name comes from ane of the final steps in the project when you use a wide knife to knock downwardly and flatten the peaks of the texture applied to the walls. This step gives the texture its stucco-like advent. To texture the walls and ceiling of an average room, the rental sprayer, the joint compound and knockdown knife will fix y'all back merely most $seventy to $eighty, and you'll be finished in one mean solar day. These are the three components you'll use:
Joint compound
To make this project as piece of cake as possible, use premixed all-purpose joint chemical compound. These buckets contain about lx lbs. of "mud" and are bachelor at nearly dwelling house centers for $9 to $ten each. Don't use the lightweight premixed compounds—y'all'll be paying for a lot of air and the mix won't be as "sticky" equally the all-purpose. It generally takes 1-1/ii to two full buckets of mud to texture the walls and ceiling of an average size (12 x 12-ft.) room.
Knockdown knives
Traditionally, knockdown textures were done with flat trowels or broad steel taping knives. However, the trowel technique is hard to chief. A much ameliorate choice is to use one of the flexible Lexan knockdown knives now available at drywall supply stores (meet Photo 5). These knives are 18 to 24 in. wide and cost $xv to $18.
Acoustical sprayer and gun.
You'll need to rent an acoustical spray gun, hopper and compressor from a rental center or paint shop for this project. Although domicile compressors work fine for the initial orange peel coat, they won't produce the volume of air yous need for the heavier topcoat.
Await to pay $25 to $30 for a i-twenty-four hours rental. While you're still at the rental store, be sure to put the machine through a dry out run to be certain it works. Besides, remove the hopper from the gun and make sure the inside of the gun is clean. Look for a trigger adjustment on the gun It allows yous to command the fluid flow. The recipes in this article will requite y'all the simply-right mixes for your projection.
Tips:
File any sharp edges off the blade mixer. Precipitous edges will scrape little plastic curlicues off the side of the bucket, bits that can clog the gun or air current upward on the wall.
You will get mud in places yous didn't want it. Don't worry! It cleans upwardly easily with a wet sponge.
CAUTION!
If you take ceiling texture applied before 1980, it may contain asbestos. Before you lot remove any ceiling texture, contact your state'southward department of environmental protection, department of health, or a regional asbestos coordinator for information on asbestos testing and removal. For a list of regional contacts, click hither. For general data on asbestos, click here.
Apply the texture
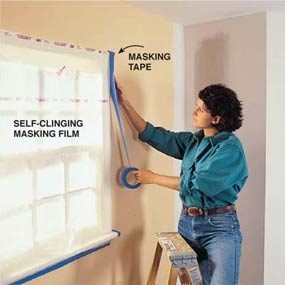
Photo 1: Mask off everything yous don't want textured
Mask your windows and doors with plastic sheeting. So cover remaining trim, outlets and light fixture bases (remove glass covers) with masking tape. Comprehend your floors with a heavy canvas or multiple layers of those bed sheets y'all haven't had the center to get rid of. Don't utilise plastic sheeting on the floor or your work area will get a skating rink.
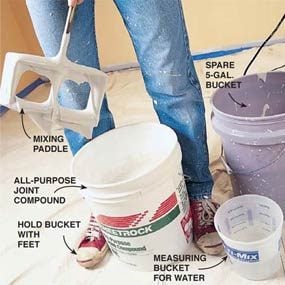
Photograph two: Add water to the joint compound and mix it
Thin the joint compound, or "mud," with h2o. Utilise a bract mixer mounted to a variable-speed 1/2-in. drill (nigh mixers are as well large for iii/8-in. drills). You can also mix the mud by hand with a v-gal. paint stirring stick (available free at paint stores). Scoop half of a full bucket of unthinned mud into an empty 5-gal. bucket and add the correct amount of water to both buckets. Hug the bucket firmly with your feet and stir. Later on the initial stirring, scrape the sides and lesser with a stick or your hand and stir again. The second stirring helps remove thicker clumps that can clog the spray gun.
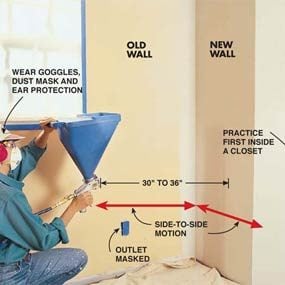
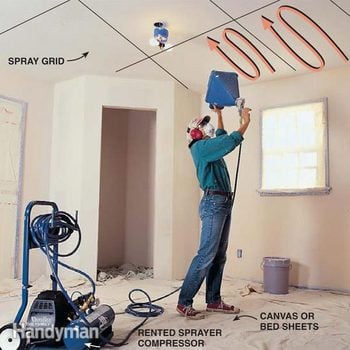
Photo 3: Spray on the base coat
Spray an orangish peel base of operations glaze on the walls and ceilings. This step volition help blend areas where new walls encounter sometime, allow consequent drying for the topcoat, and deed as a background for the final texture. Agree the gun well-nigh 30 to 36 in. from the surface. Starting in a corner, spray the ceiling first, working in grids sized according to what you can comfortably reach from a stationary position. On the walls, piece of work from side to side and from top to bottom. Let the orangish peel glaze dry out (three to viii hours).
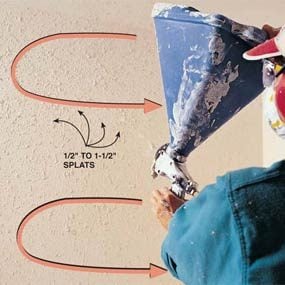
Photo 4: Apply the pinnacle coat
Apply the topping coat using the same techniques you used to spray on the base coat simply with different gun settings and mud consistency. If possible, practice in the cupboard or on a spare piece of drywall before moving to the main area. Hold the gun a bit further from the surface, up to 48 in. The splats should exist ane/2 in. to one-i/2 in. in bore. Finish spraying the entire room before going to the "knockdown" stride. After you employ the kickoff glaze, spray on a quick second coat to assistance fifty-fifty out slight differences.

Photo v: Knock down the top coat
Knock down the topping coat with an 18- or 24-in. Plexiglas knife and light pressure after the mud has prepare for 10 to 15 minutes. Start in the cupboard until you get the feel of the knife and the issue yous want. Knock it downwardly in the same gild you lot applied information technology. On the ceiling, knock down in a direction across the joists or framing. This helps compensate for unevenness of the ceiling. On the walls, start at the acme and bring the pocketknife two-thirds of the way down, then offset at the bottom and bring the knife upward to finish off the knockdown.
Photos 1 to 5 prove how to utilise the knockdown texture.
Tip:
Don't permit the hopper run dry. Keeping at to the lowest degree iv in. of mix in the hopper helps maintain a consistent menstruation.
Tip:
Always brand sure yous start with a make clean edge on the knockdown knife for each stroke. Keep a damp sponge and a saucepan of water handy for this task.
Dealing with textured ceilings
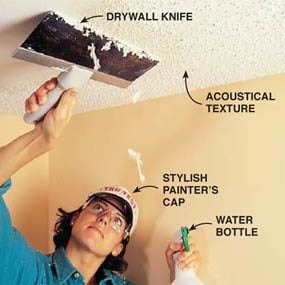
Scrape a textured ceiling with a drywall pocketknife
Round the corners on a drywall knife and use it to scrape the texture off acoustical or popcorn ceilings.
If you take acoustical or popcorn ceiling texture, remove information technology past spraying it with water, letting information technology soak in for a minute, and then advisedly scraping it off with a drywall knife. Wear goggles and a cap. To minimize adventitious gouging of the drywall, round off the corners of the knife with metal snips and remove burrs with a smooth-face file. If your ceiling texture has been painted, yous won't be able to scrape it clean. You may need to skim-coat the surface.
Painting a textured surface
Pigment a textured surface the fashion you would new drywall. Permit the "mud" dry completely. Equally it dries, it will release tremendous amounts of moisture. You'll feel as if y'all're standing in an Iowa cornfield in July. If it's warm enough outside, cut through the masking on your windows and open them, but go out the masking record in place until the surface dries. If you have some box fans, utilise them to help speed the drying.
Afterwards the walls and ceiling dry, check the surface for whatsoever spots you lot missed knocking down or whatsoever ridges you raised with the corner of the pocketknife. With 120-grit sandpaper and a sanding block, sand these loftier spots down. Begin painting with a high-quality primer applied with a 3/viii-in. nap paint roller. On the first glaze, avoid going over surfaces before they're completely dry out. The mud is water soluble and painting too soon can cause y'all to pare upward a thin layer of mud with the paint.
For the final paint glaze, utilize a loftier quality latex paint and a 3/8-in. nap roller. An "eggshell" or "satin" finish emphasizes the depth of the texture.
Other Knockdown Textures
If you desire to texture only a small surface area or a single wall or don't want to mess with a sprayer, you have an endless supply of options. Ane of the simplest and near attractive is done with a plastic loop roller or ceiling texture roller, which fits on an ordinary paint roller. To practise this texture, utilize the same methods as described in this commodity except skip the spraying steps and roll on a single glaze of mud. You tin can besides apply a knockdown texture using texture paints.
Recipes for Textures
Recipe for orangish peel coat or orangish peel ceiling texture:
- Half a bucket (thirty lbs.) of all-purpose joint compound
- 5 pints of water
- Spray gun orifice—2d or third smallest
- Compressor setting—high (25 to 30 psi)
- Trigger—half open up
- Mix consistency—thin pancake batter
- Splat size—pencil eraser
Recipe for topping coat:
- Half a bucket (xxx lbs.) of all-purpose joint compound
- 3 pints of water
- Spray gun orifice—second largest
- Compressor setting—10 to 15 psi
- Trigger—fully open up
- Mix consistency—thick block concoction
- Splat size—nickel to argent dollar
Recipe for rolled-on texture:
- Half a bucket (30 lbs.) of all-purpose joint compound
- ane pint h2o
- Mix consistency—thick oatmeal/barely pourable
Required Tools for this Project
Take the necessary tools for this DIY projection lined upward before you beginning—you lot'll salvage fourth dimension and frustration.
Mixing paddle, acoustical sprayer and gun (rental), Lexan knockdown knife.
Required Materials for this Project
Avert concluding-minute shopping trips past having all your materials ready ahead of time. Hither's a list.
Originally Published: January 07, 2019

How To Make A Textured Ceiling,
Source: https://www.familyhandyman.com/project/how-to-apply-knockdown-ceiling-texture/
Posted by: outlawexpithis.blogspot.com
0 Response to "How To Make A Textured Ceiling"
Post a Comment